How To Use A Downrigger
More Efficiently
All of us that fish with trolling lines should know how to use a downrigger effectively if we are to get our trolling lures down really deep. OK, most of the time we'll find our quarry feeding on baitfish closer to the surface - but at times, the only way is down...
Now I can't lay claim to having developed this smart little ruse to make downrigger fishing more efficient - it was shown to me by the top Sport Fishing Skipper in Grenada (West Indies), Captain aboard his Charter Boat.
But before we get on to it in detail, perhaps we should recount the standard way of how to use a downrigger first.
It goes like this...
Deploying the Downrigger Conventionally
- First, let out your trolling line until the lure is 10m or so behind the boat, then
- Attach the trolling line to the quick-release clip attached to the aft-end of the downrigger weight (or downrigger planer), then
- Slowly ease out the downrigger line to its required extent, allowing it to draw out your trolling line as it goes, then
- Set the drag on your reel, than
- Sit back, pop a beer, and await further development.
From here on, each time you want to re-deploy your trolling gear you'll have to haul in the downrigger gear to reconnect the trolling line to the quick release clip on the downrigger weight.
No big deal if you're using an electric downrigger, but a little tedious if you're using a manual one.
How To Use A Downrigger More Efficiently
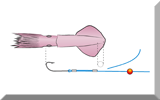
But there' s a way around all this winding the downrigger up and down; all you need is a good supply of elastic bands and a few snap swivels. In the pic we've shown a planer setup, but a downrigger weight would be equally viable.
- First, set the downrigger to the required depth, without attaching your trolling line or even the quick-release clip (which you no longer need), then
- Commence deployment of your trolling line, but stopping the line when your lure is about 12m or so behind the boat, then
- Attach an elastic band to the swivel (not the snap) of the snap swivel by putting one end through the other and pulling it tight, then
- Attach the elastic band to the trolling line in a similar fashion - you may have to do this several times to ensure that the elastic band has got a good grip on the line - then connect the trolling line to the downrigger line using the snap
- Release the trolling line slowly allowing the snap swivel to be drawn along the downwardly angled downrigger line by the drag of the lure, until it s stopped by a bead fixed a short distance above the planer.
When a fish takes, the elastic band will break, leaving the trolling line free of the downrigger line and the planer in place ready for you to do it all over again with a new snap swivel and elastic band.
When you eventually bring in the downrigger line, you' ll be able to recover the snap swivels for future use.
So now you know how to use a downrigger with a lot less effort. What's more, your lures will spend more time in the water and less time waiting for you to reset the downrigger.
Neat, or what |